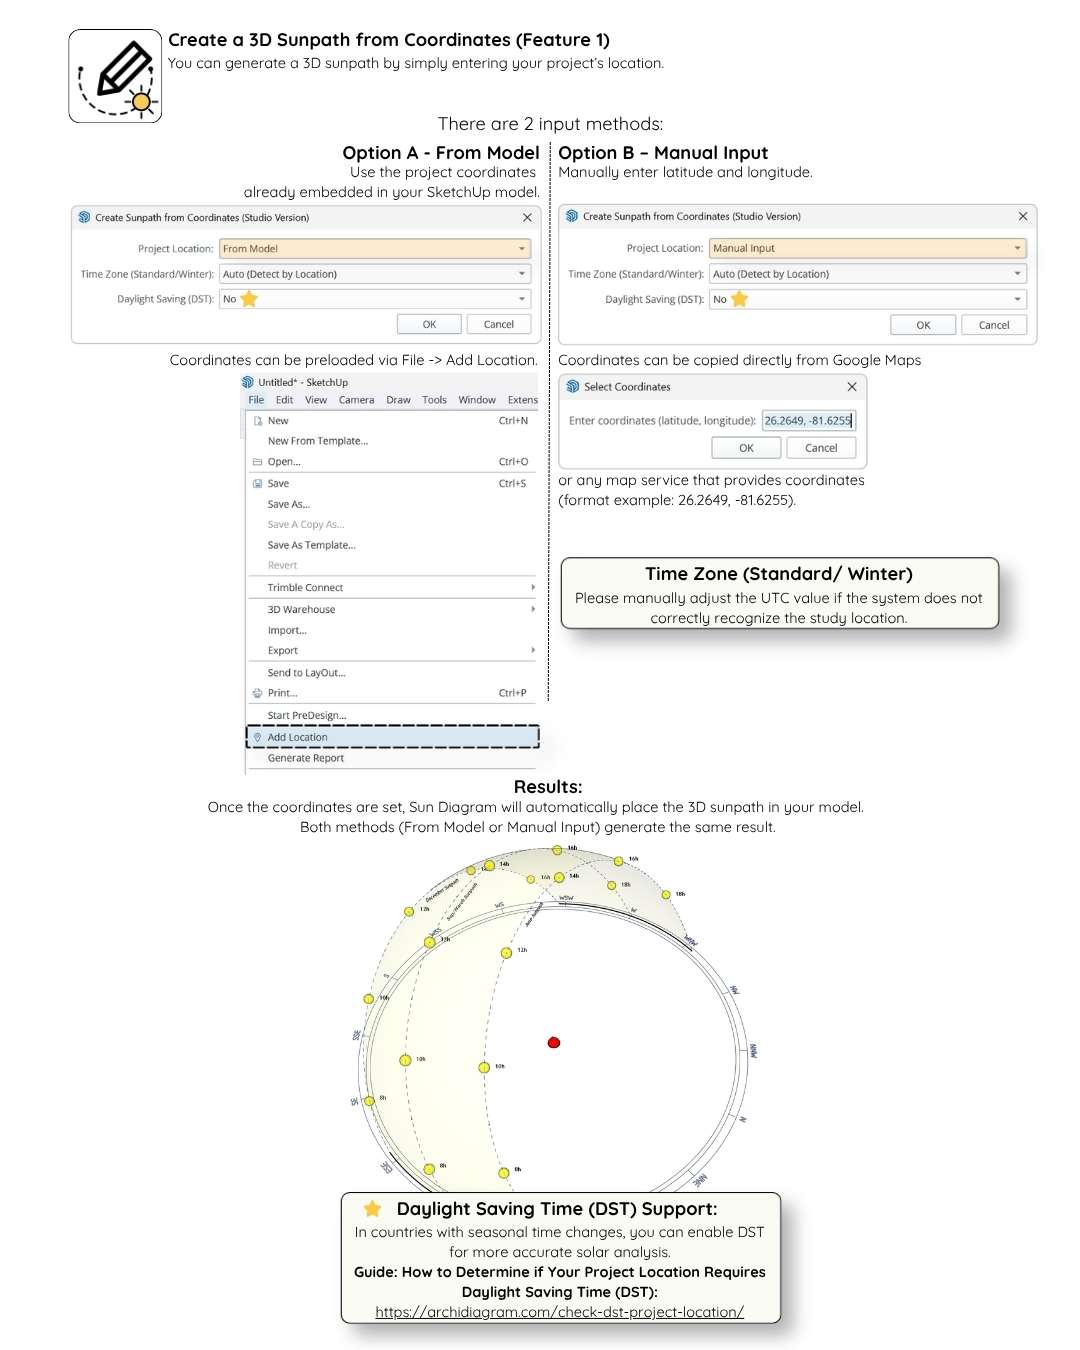
1. Create Sunpath (Feature 1)
Generate a 3D Sunpath by entering your project’s location
Choose input methods:
Option A – From Model: Use the coordinates already embedded in your SketchUp model (via File -> Add Location).
Option B – Manual Input: Enter latitude and longitude directly. Coordinates can be copied from Google Maps (format example: 26.2649, -81.6255).
---------------
⭐Smart DST Engine : Enable Daylight Saving Time (DST) for highly accurate solar analysis in regions with seasonal time changes (Premium Feature).
Why is the DST feature important?
See How It Works ▶️
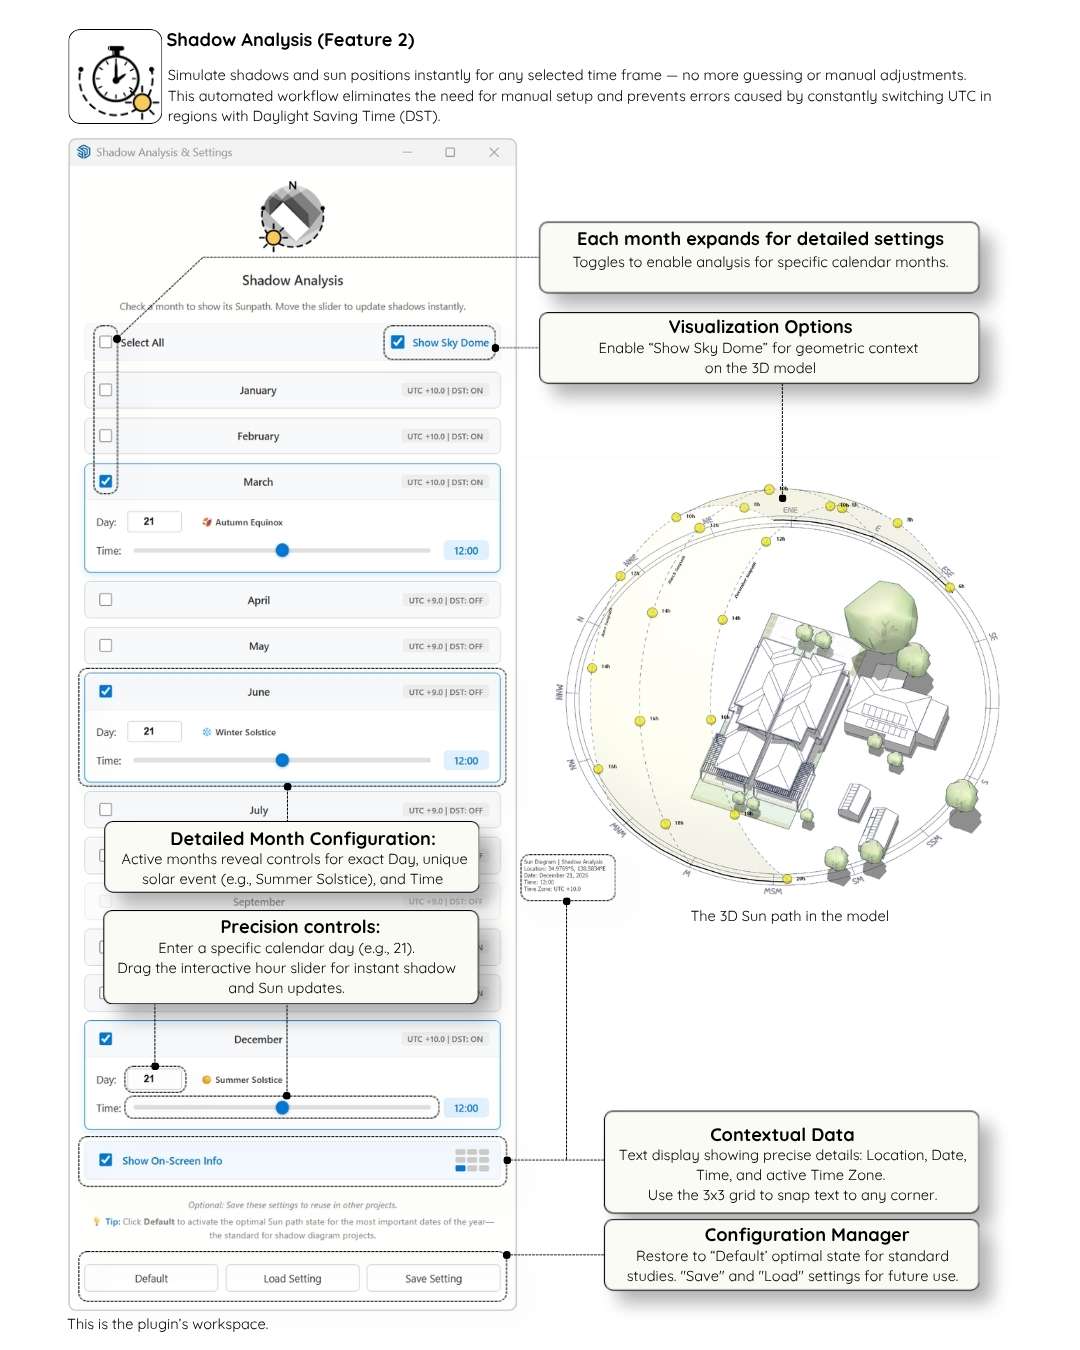
2. Shadow Analysis (Feature 2)
Simulate shadows and sun positions instantly with our real-time interactive UI.
- Real-Time Sliders: Check your desired months and drag the time slider to update shadows instantly—no guessing or clicking 'Apply'.
- Custom Dates: Select any specific day of the month (1-31) for pinpoint accuracy, or stick to the standard Solstices and Equinoxes.
- On-Screen Info (HUD): Display real-time solar data (Location, Date, Time, UTC) directly in your viewport.
--------------- Automate your workflow and prevent UTC errors with built-in Daylight Saving Time (DST) support.
See How It Works 

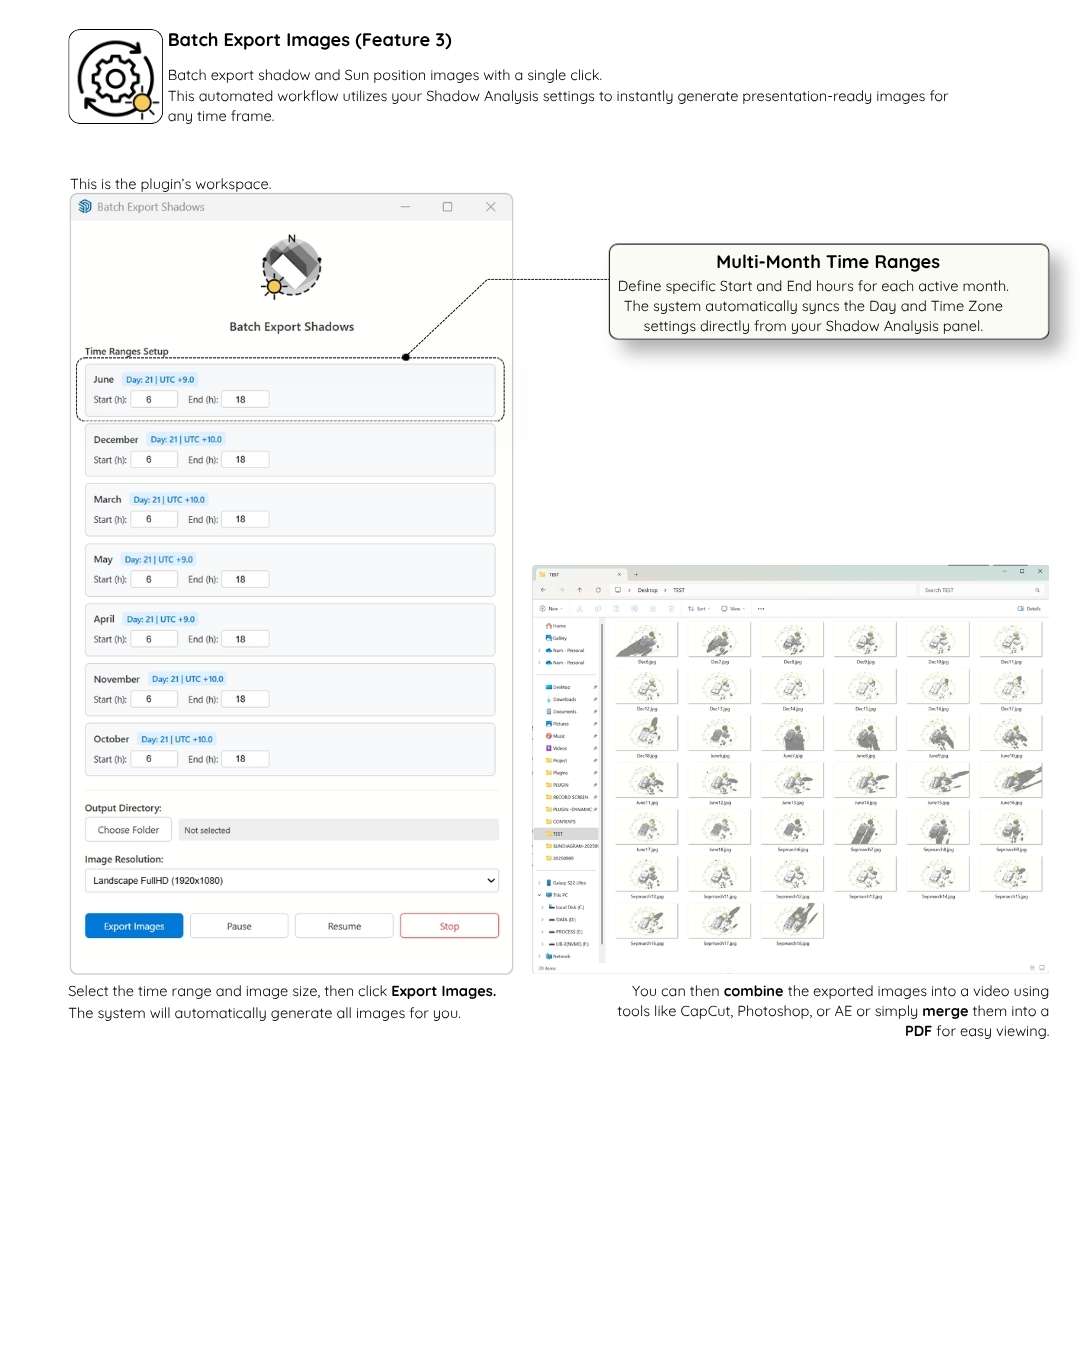
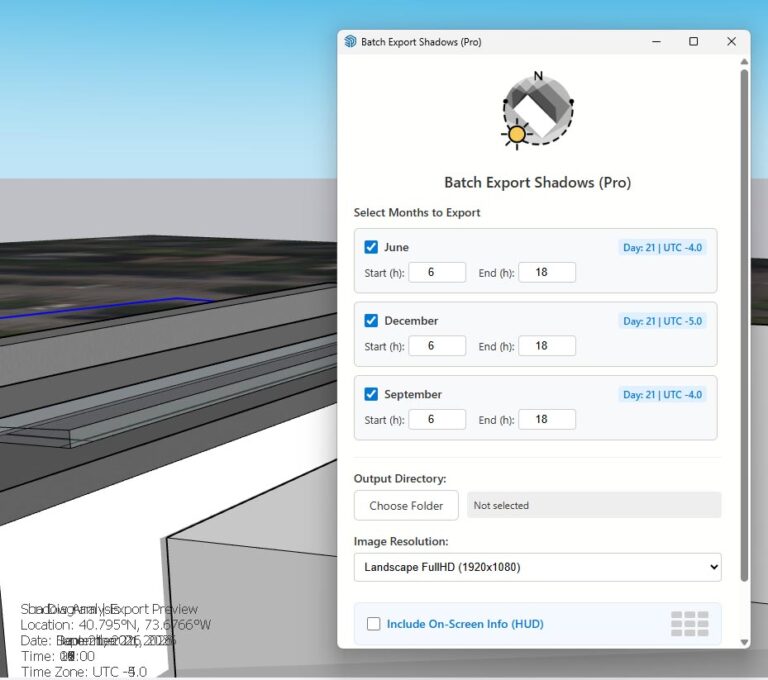
3. Batch Export Shadows (Feature 3)
Export shadow sequences with a single click to create stunning time-lapse animations.
- Automated Workflow: Select your time ranges, and let the system generate all images automatically based on your Shadow Analysis settings.
- Multiple Resolutions: Export in standard Landscape (FullHD, 2K, 4K) or Vertical formats (9:16) perfectly sized for social media (Reels, TikTok, Shorts).
- HUD Control: Choose to include or remove the On-Screen Info watermark from your final exported frames.
- Presentation Ready: Combine exported images into a video (CapCut, Premiere, After Effects) or merge into a PDF to help clients instantly understand your lighting design.
See How It Works

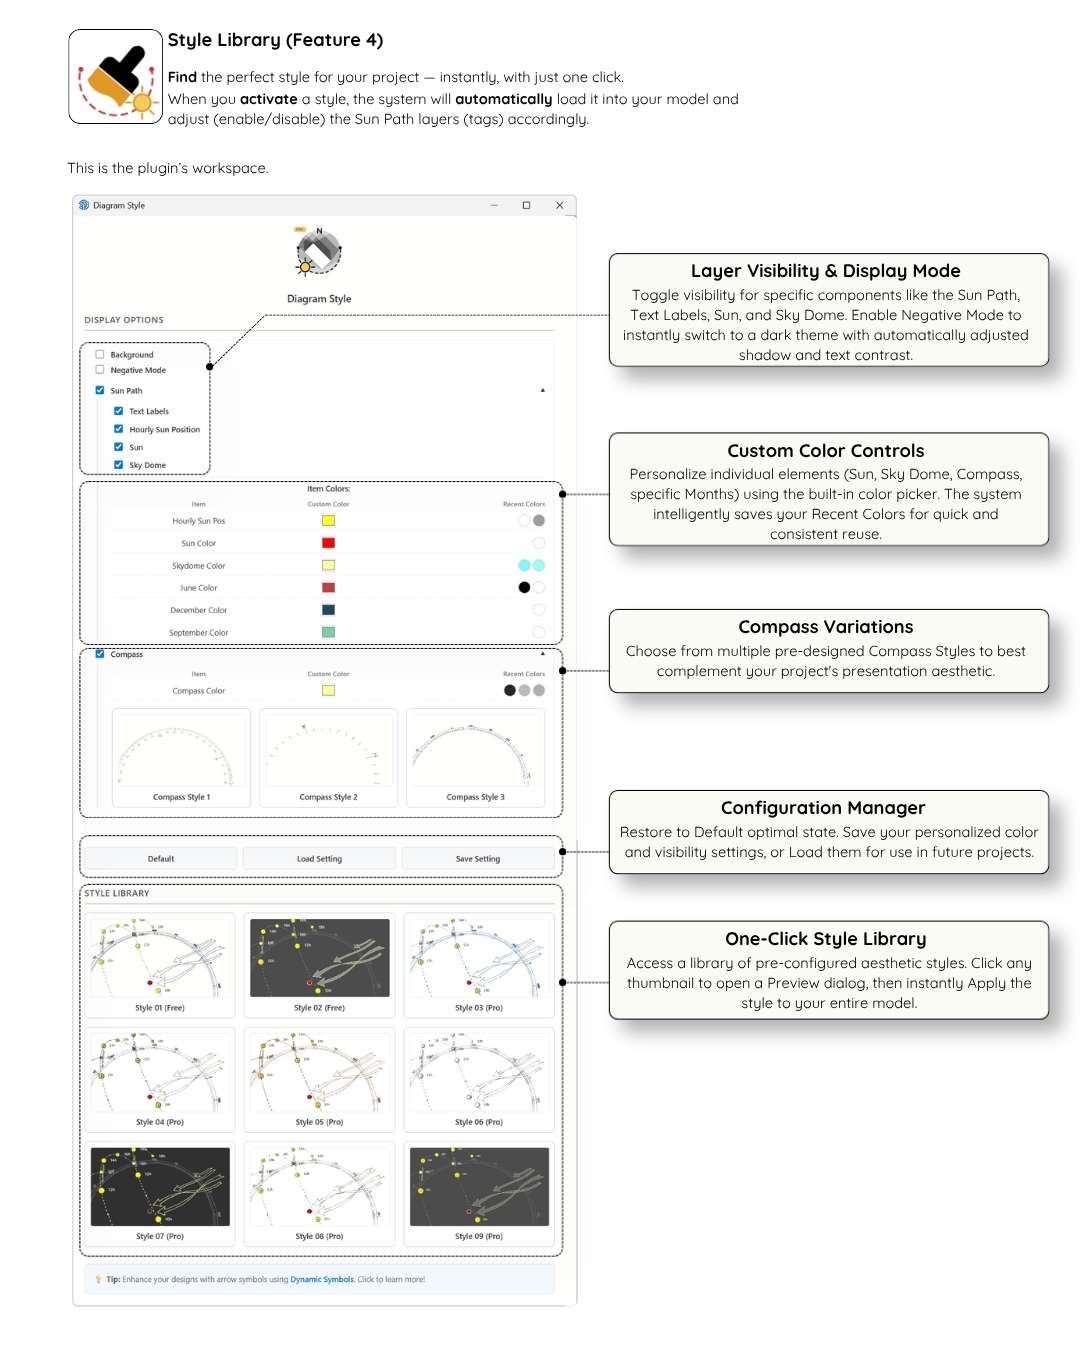
4. Diagram Styles (Feature 4)
Find the perfect visual style for your project — instantly, with just one click.
- One-Click Activation: Load a style to automatically adjust SketchUp graphics, edge settings, and Sun Path layers (tags).
- Premium Library: Unlock 09 professional diagram styles and 03 dynamic compass designs (Pro/Studio).
The Standard (Free) version includes 02 clean, beautiful styles that fit most basic presentation needs.
See How It Works

 Core Shadow Analysis:
June & December only (Any day & hour for Solstice testing).
 Updates:
Auto via SketchUp Extension Warehouse
Updates:
Auto via SketchUp Extension Warehouse/ SketchUcation
or Manual via Gumroad.
Sun Diagram is developed by Febhouse.
The Standard version is officially available on SketchUp Extension Warehouse (Alternative: Google Drive).
The Pro version is available via Gumroad or SketchUcation (Lifetime Ownership) and SketchUp Extension Warehouse or SketchUcation (Annual Subscription).
 Support: info@febhouse.com (response within 24h)
Legacy Changelog
Versions: 4.5.0 (2026-06-06)
Comprehensive Diagram Style Upgrade: We’ve completely overhauled the Diagram Style panel to give you ultimate control over your sun path’s appearance. You can now dive deeper into customization with our new, intuitive interface.Ultra-Clean Sun Path: We finally removed the Section Slice at the base! Enjoy a seamless, distraction-free 3D model without any messy cuts.
Versions: 4.0.2 (2026-04-01)
Flexible 3D Sun Path & Sky Dome (New): Generate a dynamic 3D solar dome showing the sun’s trajectory across all 12 months. Effortlessly analyze critical times like Solstices and Equinoxes, or customize it for any specific day of the year.
Instant Shadow Control & Smart DST: No more manual UTC guessing. Our system automatically calculates the correct Daylight Saving Time offsets. Use the new interactive dashboard to slide through time and see shadows update instantly.
One-Click Batch Export: Save hours of manual work. Automatically generate high-resolution (up to 4K) shadow sequences with a single click—now fully supporting your custom On-Screen HUD overlays.
Have a question? Feb AI is rigorously trained on our official documentation, patch notes, and technical structures to provide precise, real-time answers.
Just click the  icon in the bottom right to ask Feb!
Frequently Asked Questions & Documentation
What is Sun Diagram used for?
Which versions of SketchUp are supported?
Are there different versions of Sun Diagram?
Can I use the plugin for commercial projects?
Where can I download free sample files that use this plugin?
Why does the default Sunpath only show specific months (June, Dec, March/Sep)?

How does the plugin handle tropical countries with unique sun paths and different time zone rules (like no DST)?
Do I need to manually turn DST on and off when analyzing different months?
I used "Create Sun Path from Coordinates," but I only see sun rings and time labels. What went wrong?

What is the difference between the Studio and Pro versions?
I already have the Pro version. Do I need to subscribe to Studio?
Why is there only the "Sun Diagram Pro" version on SketchUcation, and no "Studio" version?
Why is the version of Sun Diagram Pro on SketchUcation and Gumroad higher than the version on the Extension Warehouse?
What do I receive after purchasing Sun Diagram Pro?
Can I share the plugin with colleagues?
Do you offer refunds?
How do I cancel my subscription or free trial for the SketchUp Sun Diagram Studio extension? Will I be charged automatically after the trial ends?
How do I install the Sun Diagram plugin?
Where is my License Key for the Studio version?
Can I use the Sun Diagram plugin if I am working offline or cannot sign in to my Trimble account?
I purchased Sun Diagram Pro on SketchUcation, how do I activate my license?
When I try to enter the code, I get an Activation Error: "SSL_connect". How do I fix this?

Can I use the plugin on multiple machines or switch computers?
How are purchases processed?
I installed it, but the interface doesn't show. What should I do?
Does the Studio version require an internet connection?
How do I know if I should turn the DST toggle ON or OFF for my project?
How do I remove stuck or overlapping HUD text (Date, Time, Location) after using Batch Export?
How do I turn off or hide the Sun Path diagram while continuing to work?
The Sun Path diagram itself is casting a shadow on my model. Can I turn that off?
Once the Sun Path diagram is activated, is it possible to see the shadows but turn off the diagram?
Why do the hour texts (6h, 8h, 10h, 12h...) in the sun path lose their colors and appear black?
Why do some texts like 12h, 14h, 16h... on the Sun path suddenly disappear when I save the file?

Meet the Creator:
Hi, I'm Nam Nguyen, the developer behind this tool and the founder of the Febhouse ecosystem.
Scan the QR code to connect with me directly on Instagram @febhouse_com, where I share behind-the-scenes development, early updates, and daily design inspiration!
www.instagram.com/febhouse_com/